Run your finetuned LLM with Ollama
Most often, you can get away with using a closed model or an open model. However, there are situations where you might want to fine-tune an LLM on your dataset. Generally, you should avoid fine-tuning an LLM unless you have a good reason for it.
Once you have fine-tuned your model, the question arises: how do you make it work with other tools in the ecosystem that use the GGUF format?
Disclaimer: I used this workflow for most of my projects, so instead of wasting time hunting for the steps each time, I decided to jot them down for future me. If it helps others too, bonus! Think of this as my personal cheat sheet turned blog post. Don’t expect any groundbreaking insights here; it’s just my way of staying organized!
Following are the steps that I follow:
-
Fine-tune LLM using Axolotl: Axolotl is a user-friendly wrapper around HuggingFace libraries, designed to simplify the fine-tuning process. Select your model and dataset from the HuggingFace Hub, update the closest config file, and let Axolotl handle the rest.
-
Export fine-tuned model in GGUF format using Llama-cpp: Once your model is fine-tuned, use Llama-cpp to export it in the GGUF format. This format ensures compatibility with various tools in the ecosystem.
-
Run Inference using Ollama: Finally, use Ollama to run inference on your fine-tuned model. This step allows you to deploy your model and start generating predictions.
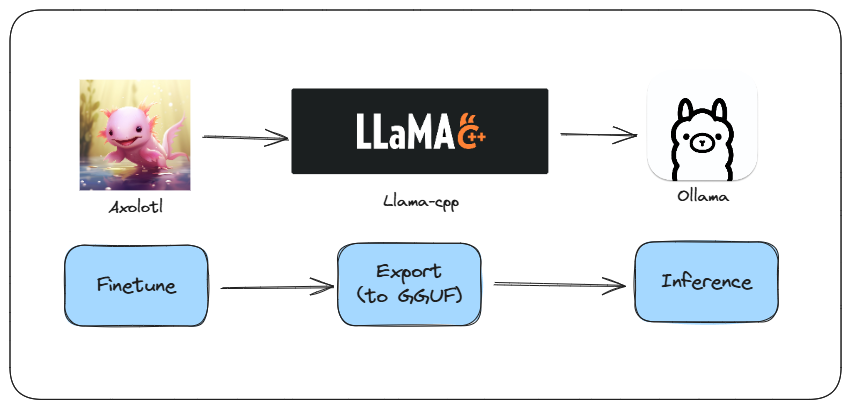
Here is a very basic but end-to-end workflow.
1. Fine-tuning
There are several frameworks for fine-tuning LLMs. I really like Axolotl and Unsloth. Axolotl is a thoughtfully designed wrapper around HuggingFace libraries. It has all the best practices built-in and works very well with the HuggingFace ecosystem. Hence, it’s super easy to use.
You can select any model and/or dataset from the HuggingFace Hub, identify the closest config file for your task, and update it. With Axolotl, it’s very difficult to make mistakes, making the fine-tuning process much smoother and more reliable.
Following steps will guide you through setting up the environment, preparing data, fine-tuning the model, and merging the adapter using Axolotl.
- Clone the Axolotl repository:
# Skip this step if you've already cloned Axolotl
git clone --recursive https://github.com/OpenAccess-AI-Collective/axolotl.git
cd axolotl
- Create a new virtual environment and install the required libraries:
# Create new environment (important)
conda create -n axolotl python=3.10
conda activate axolotl
conda install pytorch torchvision torchaudio pytorch-cuda=12.1 -c pytorch -c nvidia
conda install cuda-nvcc -c nvidia
- Install additional Python packages:
python3 -m pip install packaging ninja
python3 -m pip install -e '.[flash-attn,deepspeed]'
- Prepare the data:
CUDA_VISIBLE_DEVICES="" python3 -m axolotl.cli.preprocess examples/tiny-llama/lora.yml
- Fine-tune the model with LoRA:
accelerate launch -m axolotl.cli.train examples/tiny-llama/lora.yml
- Merge the adapter with the base model:
accelerate launch -m axolotl.cli.merge_lora examples/tiny-llama/lora.yml
Reference
- https://github.com/OpenAccess-AI-Collective/axolotl?tab=readme-ov-file
2. Exporting
Now it’s time to convert the HuggingFace model to a GGUF model. One may ask why convert to the GGUF format instead of continuing to use the safetensor or bin formats used by HuggingFace and PyTorch, respectively.
The GGUF format offers optimized performance, reduced model size through quantization, and improved inference speed, making it ideal for high-performance applications and deployment on resource-constrained devices like CPUs. It also provides flexibility in balancing model size, speed, and accuracy while ensuring compatibility with specific hardware.
As a result, there are numerous tools that utilize the GGUF format, significantly increasing the number of tools available to consume your LLM model.
Returning to the topic at hand, Llama.cpp comes with a converter script to perform this conversion. Here are the steps:
- Get the script by cloning the llama.cpp repo:
git clone https://github.com/ggerganov/llama.cpp.git
cd llama.cpp
- Create new virtual environment and install the required python libraries:
# create new environment (important)
conda create -n llama-cpp python=3.10
conda activate llama-cpp
pip install -r requirements.txt
- Verify the script is there and understand the various options:
python convert.py -h
- Convert the HF model to GGUF model:
python convert.py <output_dir> --outtype q8_0
In this case we’re also quantizing the model to 8 bits by setting -outtype q8_0. Quantizing helps improve inference speed, but it can negatively impact quality. You can use --outtype f16 (16 bit) or --outtype f32 (32 bit) to preserve original quality.
Reference:
- https://github.com/ggerganov/llama.cpp/discussions/2948
- https://www.substratus.ai/blog/converting-hf-model-gguf-model/
3. Deployment
Once you have your model in GGUF format, there are several tools you can use to run inference. Personally, I like to use Ollama and llama-cpp-python. Since it’s pretty straightforward to run GGUF models using llama-cpp-python, here I will show you how to use it with Ollama.
⚠️ You can find many popular models in GGUF format at TheBloke.
- Create a
Modelfilewith the following content:
FROM merged-1B-Q8_0.gguf # model_path
- To create a model from your
Modelfile, use the following command:
ollama create <model_name> -f Modelfile
- To test the model, simply run:
ollama run <model_name>
Reference
- https://github.com/ollama/ollama/blob/main/docs/import.md